| View previous topic :: View next topic |
| Author |
Message |
R Mac
Member
Joined: 05 Mar 2013
Posts: 80
Location: Near Phily USA
|
 Posted: Wed Apr 10, 2013 11:31 am Post subject: Peg fitting trouble. Posted: Wed Apr 10, 2013 11:31 am Post subject: Peg fitting trouble. |
 |
|
I am having trouble getting my pegs to be nice and round. As you can see from the burnished marks on the one in the pic, the peg is "chattering" and cutting unevenly in the shaper. 
Here is a pic of my shaper.
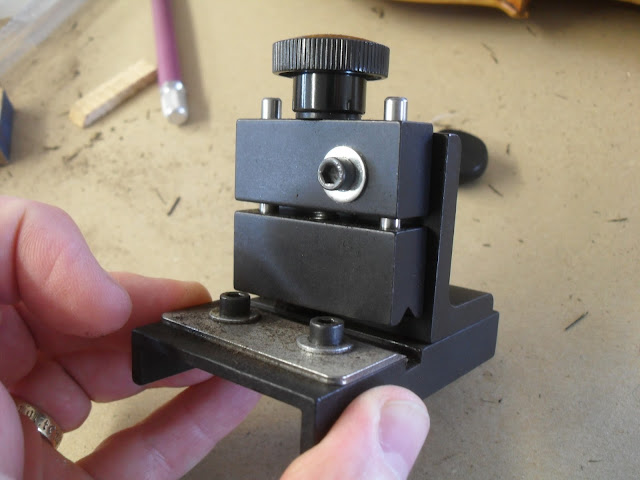
Is the problem that I am using cheap pegs (*) ?....or is there a fundamental problem with this style of shaper?
(*)I freely admit that I am using the cheap pegs from Ebay.
Thanks!
Mac |
|
| Back to top |
|
 |
kjb
Super Member
Joined: 06 Feb 2013
Posts: 385
|
| Posted: Wed Apr 10, 2013 12:18 pm Post subject: |
|
|
ok , I will give this a shot, and if I am wrong I hope someone else corrects me. you may want to wait to hear from others.
If your hole in the peg box is round;
then you are not making good contact with the entire circle in the pegbox. This may be the pegs or the peg shaper. in either case you have to make the peg symetrical and smooth so you have good contact , two good fitting surfaces, they will work very well if you do that.
see the shiny parts on the peg,
they are the parts that are hitting, the other parts are not.
so you need to take the shiny parts off with a scraper, or something that will take off a small amount and of course keep it round , maybe a rounded scraper, just a little at a time, if you go too far you will create more problems than you solve.
put the peg back in and repeat until all the circle is hitting the hole.
once you have all the surface area hitting
there are different methods for finishing them off, Tripoli/ soap.
on the net you can find out more about that. |
|
| Back to top |
|
|
kjb
Super Member
Joined: 06 Feb 2013
Posts: 385
|
| Posted: Wed Apr 10, 2013 12:22 pm Post subject: |
|
|
I also have used that type and had trouble, in my case the blade was not "scary sharp" as they say, but also set up was a problem.
your blade may not be set right, pushing in too hard, blade not sharp, but some fine tuning will be needed. |
|
| Back to top |
|
|
R Mac
Member
Joined: 05 Mar 2013
Posts: 80
Location: Near Phily USA
|
| Posted: Wed Apr 10, 2013 12:40 pm Post subject: |
|
|
KJB,
Thanks for your reply.
I have been using the back of an Exacto blade to scrape the shiny parts. That helps, but it sure is tedious!
I resharpened my shaper's blade last night, and it cut with greater ease, but with no less chatter and grab. I currently have about .5mm of blade exposed. That is enough to make splintery shavings, rather than just dust. Do you think that's is too aggressive?
Mac |
|
| Back to top |
|
|
kjb
Super Member
Joined: 06 Feb 2013
Posts: 385
|
| Posted: Wed Apr 10, 2013 2:10 pm Post subject: |
|
|
I meant the erase the first post, sorry.
Have you checked the angle with you reamer that it is the same?
try going very slow at the beginning with little pressure inwards, till it gets rounder. I have not done pegs in 6 months or so , memory's not as reliable as I would like! |
|
| Back to top |
|
|
R Mac
Member
Joined: 05 Mar 2013
Posts: 80
Location: Near Phily USA
|
| Posted: Wed Apr 10, 2013 2:22 pm Post subject: |
|
|
KJB,
I have been messing with the angle of the top block of the shaper, a little at a time, until I got both contact patches on the peg to appear about the same. I also did the trick of turning the peg back and forth smartly and then testing the temperature of the resulting contact patches against my lip.
All in all, I think the angle is OK.
I am with ya' about going slowly until the peg is round. The one I brought down to size the fastest is the one with the greatest chatter problem. So, that certainly rings true.
Mac |
|
| Back to top |
|
|
rs
Member
Joined: 14 Jan 2009
Posts: 188
Location: Holland, Michigan
|
| Posted: Wed Apr 10, 2013 3:05 pm Post subject: |
|
|
I usually carve my own pegs for my instruments, at least for the past year anyway. They often take me over 8 hours a-piece to make depending on the intricacy of carvings I want. I use this style of shaver. I like adjustable shavers because they give me a little more flexibility. If I were to place the peg in the shaver and tighten down the shaver and start turning the peg, every time the peg will rattle and will come out like a rounded triangle. Instead, I adjust the tension of the shaver with no peg shaft inserted to just the tiniest amount smaller than the peg shaft in my hand and "screw" the peg into the shaver. I keep repeating this process until my peg is the thickness I want. Believe me, I do not want to ruin the shaft or the peg is ruined and I have lost a day's work not to mention trying to match the wood and cut of the other three pegs.
I treat the shaver as I do a plane; "scary sharp" and just enough hangover to shave, not carve the shaft.
Hope this helps.
_________________
Randall Shenefelt |
|
| Back to top |
|
|
Clifford Green
Junior Member
Joined: 05 Feb 2012
Posts: 6
Location: Virginia
|
| Posted: Wed Apr 10, 2013 4:07 pm Post subject: |
|
|
| If you can get that shaper to work, please share the trick. I bought one of those hoping to use it for non standard peg holes. It now lives in my "tried an failed box". The multi hole pencil sharpener type are much more consistent in use. The commonly available Herdim shapers work OK,(a lot better than your adjustable)but the blades are a bit thin IMO and the set up can be tedious. The Alberti Designs are very nice but expensive. The Alberti shapers are easy to adjust, have nice blades and the pegs are very smooth straight from the shaper |
|
| Back to top |
|
|
kubasa
Member
Joined: 13 Sep 2007
Posts: 212
|
| Posted: Wed Apr 10, 2013 4:18 pm Post subject: |
|
|
I use the same peg shaper and work it kind of like RS mentioned. The first thing I had to do was to realign the blade when I got it so the taper matched the reamer. I keep the blade "scary" sharp as RS said and I keep it locked down in my vise. Then I use my left hand to slowly tighten down on the peg while turning slowly but consistently with my right hand. Hard to explain but it works for me. There's probably better out but this works fine for me for now.
James |
|
| Back to top |
|
|
R Mac
Member
Joined: 05 Mar 2013
Posts: 80
Location: Near Phily USA
|
| Posted: Wed Apr 10, 2013 5:36 pm Post subject: |
|
|
Thanks, guys!
I'll see if I can't sharpen the blade, and adjust it for a finer cut.
Mac |
|
| Back to top |
|
|
R Mac
Member
Joined: 05 Mar 2013
Posts: 80
Location: Near Phily USA
|
| Posted: Wed Apr 10, 2013 5:39 pm Post subject: |
|
|
I confess, that I am a bit surprised that no one is rebuking me for using cheap pegs.
Are other folks here using cheepies as well?
Mac |
|
| Back to top |
|
|
TimRobinson
Junior Member
Joined: 02 Jul 2009
Posts: 4
Location: Sydney, Australia
|
| Posted: Wed Apr 10, 2013 5:56 pm Post subject: |
|
|
Of all things I can have trouble with in making a violin, fitting pegs weirdly is not one. I also use el-cheapo pegs and my shaper is a bit of hardwood I reamed out and used the blade from a commercial shaver that I have never used as the hole is too wide. The taper of the hole and the reamer needs match, as has been said. Slight adjustments can be made by slipping fine wet and dry in the shaper hole - or by loosening the screws that hold the blade very slightly. The screws I used have tapered heads so loosing them allows the blade to move slightly.
I keep thinking I should buy a better peg shaper, but if it ain't broke...
FWIW.
Tim |
|
| Back to top |
|
|
DonLeister
Moderator
Joined: 29 Mar 2007
Posts: 383
Location: Richmond, VA
|
| Posted: Wed Apr 10, 2013 10:09 pm Post subject: |
|
|
-The- thing I like about that peg shaper is once it is set up it takes a lot of wood off quickly. It doesn't come with good set up instructions unfortunately.
I get mine set up pretty close and use it to hog much of the wood off. I use other shapers to get a better finish and fit.
It's been a while since I set mine up but I think the way I did it was this. You need a cylindrical rod about 8-10 mm. diameter, long as a peg, to use as a guide to align the ^ on the top moveable section with the lower part that has the blade. The ^ section should be adjusted initially to be parallel (no taper) with the blade, using the adjustments on the top of the jig, near the big knob. Once that is parallel adjust the alignment of the whole thing using the little allen screws on the base , behind the assembly ( the screws opposite where you see his thumbs. Don't ever change those adjustments). Then adjust the taper with the screws on the top of the jig, near the big knob.
The down side of this shaver is that you cannot easily change the taper for different pegs. You can, but use the top screws, it's just not as easy as other shavers. |
|
| Back to top |
|
|
Michael Darnton
Moderator
Joined: 23 Mar 2007
Posts: 1347
Location: Chicago
|
| Posted: Wed Apr 10, 2013 10:40 pm Post subject: |
|
|
I don't much care for that shaper, but the best strategy I know for getting good results, after it's properly set up as Don shows, is to cut very little at a time, with minimal pressure, and turn the peg as quickly as possible. And once you get things running wrong, all is lost! The problem is that you can't really guarantee a perfectly round peg with just four-point contact on the peg. That's why "real" peg shapers work with as close to 100% contact around the peg as possible.
In shaping pegs I often find Special Human Lubricant (spit) on the pegs useful to soften the wood, but other times it hurts rather than helps..
Cheap pegs? That's all I use. But you need to buy four sets to get three, or maybe two, in my experience.
_________________
new blog at my site! http://darntonviolins.com/blog
my work sites: http://darntonviolins.com and http://darntonhersh.com |
|
| Back to top |
|
|
R Mac
Member
Joined: 05 Mar 2013
Posts: 80
Location: Near Phily USA
|
| Posted: Thu Apr 11, 2013 9:10 am Post subject: |
|
|
Tim,
Thanks for the description of your peg shaper. I built one of these when I made my hurdy gurdy about 15 years ago; and it worked OK. In the intervening (non instrument) time I lost track of it. Perhaps I need to "reinvestigate" that technology.
Mac |
|
| Back to top |
|
|
|

 FAQ
FAQ Search
 Memberlist
 Usergroups
 Register
 Profile
 Log in to check your private messages
 Log in


