| View previous topic :: View next topic |
| Author |
Message |
MANFIO
Super Member
Joined: 11 Apr 2007
Posts: 458
Location: Sao Paulo
|
 Posted: Sat Apr 12, 2008 8:10 am Post subject: Shaping the corners - a new tutorial Posted: Sat Apr 12, 2008 8:10 am Post subject: Shaping the corners - a new tutorial |
 |
|
Hi all! I have noticed that shaping the corners properly is a problem for newcomers. Corners are a tough test for newcomers, they may be too long, too short, too narrow (rendering the appearence of the instrument too weak), too wide, too hooked, etc.
So I decided to make this small tutorial about this subject. I'm not a schollar in violin making and my approach here, again, will be practical, and it's the method I'm currently using for my violas. Again, it's not an "official" method, it's my personal method.
The final appearence of the corners will depend heavily on the ribs form that are bellow them, so I'll start with the ribs. It's a good thing following good plans, such as those published by THE STRAD magazine and try to copy the forms of the instrument that is inspiring you
Based on the Strad poster, I use the dividers to mark the end of the corners over my corner blocks:

In this way I'll define the end, the point of the finished corner block, that will be one or two milimeters shorter than the rib mitre, because the rib mitre will add one or two milimeters to the final shape.
These four points given by the dividers will be equidistant from the center line and geometrically balanced. You will find in the Strad Poster that Italian violins are not symetrical, in the case of this viola I've built a symetrical mold but, eventually, the instrument will be slightly assymetrical due to the use of the inner form, that creates small irregularieties.


Then I lightly glue my rib cage (just by the 6 blocks) to the back (wich edges are already thinned to 5 milimeters) with thick paper betwen the 6 blocks to make further removal easy. Then I reduce the edge to the final overhang, leaving the corners untourched and wide.
I start shaping the corners by cutting their point in the proper angle and overhang. The angle used to cut the end of the corner is quite important for the final look. I try to guess the angle used in the model I'm being inspired (here the Andrea Guarneri CONTE VITALE viola), I use the real size pictures of the back, since the corners of the top are in general damaged, I put a rule over it and project the line over the upper part of the back and take the distance from the centerline with a divider:


I'll do the same with the upper corners:

and transfer the measuments for my back:

_________________
www.manfio.com
http://www.flickr.com/photos/7875988@N02/with/464604020/ |
|
| Back to top |
|
 |
MANFIO
Super Member
Joined: 11 Apr 2007
Posts: 458
Location: Sao Paulo
|
| Posted: Sat Apr 12, 2008 8:14 am Post subject: |
|
|
Now, using a rule, I'll project this line to get the angle in which my corner will be cut:

I will draw some lines over the corner, that will guide me while cutting the corner. I draw many lines because if I cut out the outer ones the inner ones will remain to continue guiding me:

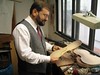
I'll use a small low angle block plane to cut the corners to their final overhang distance (here I'm using 3 milimeters of overhand, but Del Gesù used up to 5 milimeters in some of his violins). Since the rib cage and the plane are over a flat surface, the plane will cut in a 90 degrees angle. The plane will cut small amounts of wood, allowing me to control the overhang more precisely than if I were using a small saw or other tool:

_________________
www.manfio.com
http://www.flickr.com/photos/7875988@N02/with/464604020/ |
|
| Back to top |
|
|
MANFIO
Super Member
Joined: 11 Apr 2007
Posts: 458
Location: Sao Paulo
|
|
| Back to top |
|
|
MANFIO
Super Member
Joined: 11 Apr 2007
Posts: 458
Location: Sao Paulo
|
| Posted: Sun Apr 20, 2008 1:53 pm Post subject: |
|
|
I'll repeat the process with the 4 corners.
Now I mark a point in the end of the corner aligned with the rib mitre:

Now I draw a line from this point to point in the centerline (I find it by eye):

With the divider centered in the centerline I draw an arch that will touch the first line:

Then I trace another line like this. These two lines will give me a visual orientation of the corners:


_________________
www.manfio.com
http://www.flickr.com/photos/7875988@N02/with/464604020/ |
|
| Back to top |
|
|
MANFIO
Super Member
Joined: 11 Apr 2007
Posts: 458
Location: Sao Paulo
|
| Posted: Sun Apr 20, 2008 1:55 pm Post subject: |
|
|
Now I will draw two parallel lines, one above and one below this line, with the same width of the corner I'm intending to make, here about 8.5 milimeters.
Some years ago now I would cut the corners with a knive, observing it carefully as the work developed, in order to get good, harmonious corners.
Well, now I'm using this hetherodox method (ok, some will frown upon me...). First I choose a round object that has the same radious of the model that is inspiring me. Here I chose a small bottle for the lower part of the C bouts, it conforme to the outline of my model:

Now I wrap a rather coarse sandpaper over the round object and use it to shape the corner, since it has the same shape of the model that is inspiring me it will create a similar curve on my corner:


I'll choose rounded objects that conform to the other corners and repeat the same process. Here the rounded object is the handle of one of my gouges:

I'm using a coarse sandpaper to work fast, but you can use a finer sandpaper to have more control of the shaping process. Keep the sandpaper parallel to the ribs:

Here I'm controling the corner width with my calipers:

And this is what I have now:

Some would consider it ok as it is now, but I will remove some wood of this part on the C bouts, both in the lower and upper corner to make the final part of the corner a bit parallel, I'll do this with a knife:

And get something like this:

I'll repeat the method with the eight corners:

_________________
www.manfio.com
http://www.flickr.com/photos/7875988@N02/with/464604020/ |
|
| Back to top |
|
|
MANFIO
Super Member
Joined: 11 Apr 2007
Posts: 458
Location: Sao Paulo
|
| Posted: Sun Apr 20, 2008 1:58 pm Post subject: |
|
|
The corner may be left "square" or may be slightly rounded, I've done mine square in the past but now I'm making them slightly ronded.
For a reference, here a template of a Strad cello corner in the Museo Stradivariano di Cremona, with Strad's autograph "misura per le punte alli violioloncelli" (or something like that). The photo is by Melving, if I'm not wrong, he posted it here:

All the following pics are from the site of the Shrine to Music Museum.
Here a Strad violin corner with some wear:

Now a Girolamo Amati violin corner:

Here the beloved Andrea Guarneri viola tenore corners, this instrument is a favorite among many makers, including Michael Darnton. Notice that apparently he left the corner "square" instead of rounding it. Notice also the cut lines left by a "grafietto tagliente" to mark the limits of the channel over the purfling:


_________________
www.manfio.com
http://www.flickr.com/photos/7875988@N02/with/464604020/ |
|
| Back to top |
|
|
james ansara
Junior Member
Joined: 09 Jun 2010
Posts: 19
Location: toronto
|
| Posted: Sun Mar 06, 2011 9:17 pm Post subject: corner tutorial |
|
|
| Manfio, I was looking at your corner tutorial,but the photos were not present.This visual information would help me greatly!I also thank you for the time you spend on your computer,I keep my laptop on the work bench! James |
|
| Back to top |
|
|
Chad48309
Member
Joined: 26 Sep 2010
Posts: 110
Location: Michigan
|
| Posted: Mon Mar 07, 2011 10:37 am Post subject: Re: corner tutorial |
|
|
| james ansara wrote: | | Manfio, I was looking at your corner tutorial,but the photos were not present.This visual information would help me greatly!I also thank you for the time you spend on your computer,I keep my laptop on the work bench! James |
The same. If you could host the photos on a more reliable site like ImageShack.us or such, then I could pull the photos and text and compile them into a PDF and ePub that can be then viewed on any digital reading device or PC, which I can then host on a fileshare and post here. Of course, every photo will be listed as being your original and the entire work's author will be listed as you (neither my name nor any other will have any part in the compiled text).
If this sounds reasonable, let me know. I won't take any action without your consent.
_________________
-C.S. |
|
| Back to top |
|
|
violinarius
Member
Joined: 14 Dec 2007
Posts: 171
|
|
| Back to top |
|
|
|
|
You cannot post new topics in this forum
You cannot reply to topics in this forum
You cannot edit your posts in this forum
You cannot delete your posts in this forum
You cannot vote in polls in this forum
|
Powered by phpBB © 2001, 2005 phpBB Group
|


