| View previous topic :: View next topic |
| Author |
Message |
MikeCooper
Member
Joined: 08 Nov 2023
Posts: 175
Location: USA Georgia
|
 Posted: Wed May 28, 2025 12:18 pm Post subject: Posted: Wed May 28, 2025 12:18 pm Post subject: |
 |
|
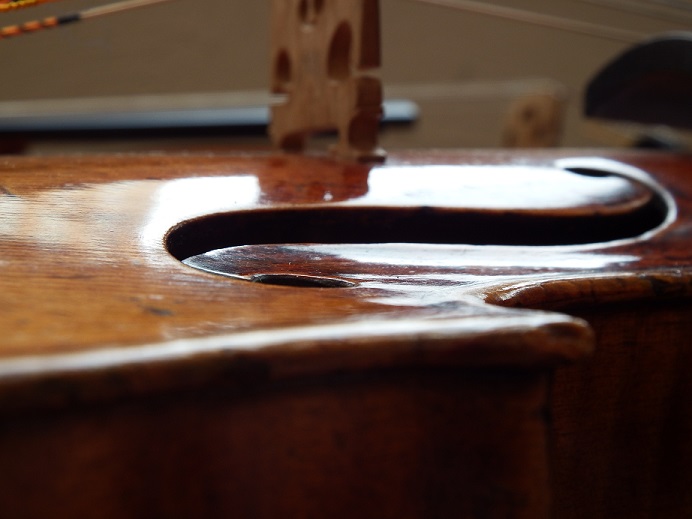
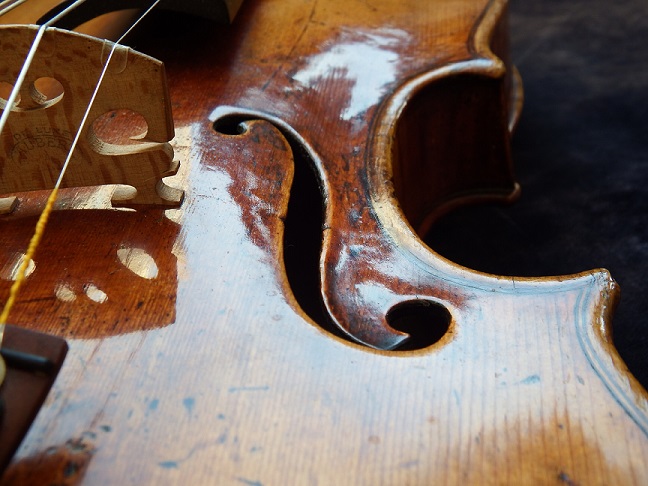
Here are some good views of a Strad posted on MN. The person posting it identified it as the Thunis. Somewhere I have some more good pics of another Strad, if I can find them.
 upload image upload image
 upload img upload img |
|
| Back to top |
|
 |
John Cadd
Super Member
Joined: 23 Jul 2009
Posts: 1335
Location: Hoylake
|
| Posted: Wed May 28, 2025 12:52 pm Post subject: violin build |
|
|
| If the top is still thick you have an optical illusion effect . The photo of a finished violin has dark edges so that`s yet another optical illusion. Some makers tilt the edges to make it all look thinner . It might help to have a rule book to follow or disagree with . |
|
| Back to top |
|
|
MikeCooper
Member
Joined: 08 Nov 2023
Posts: 175
Location: USA Georgia
|
| Posted: Wed May 28, 2025 8:56 pm Post subject: |
|
|
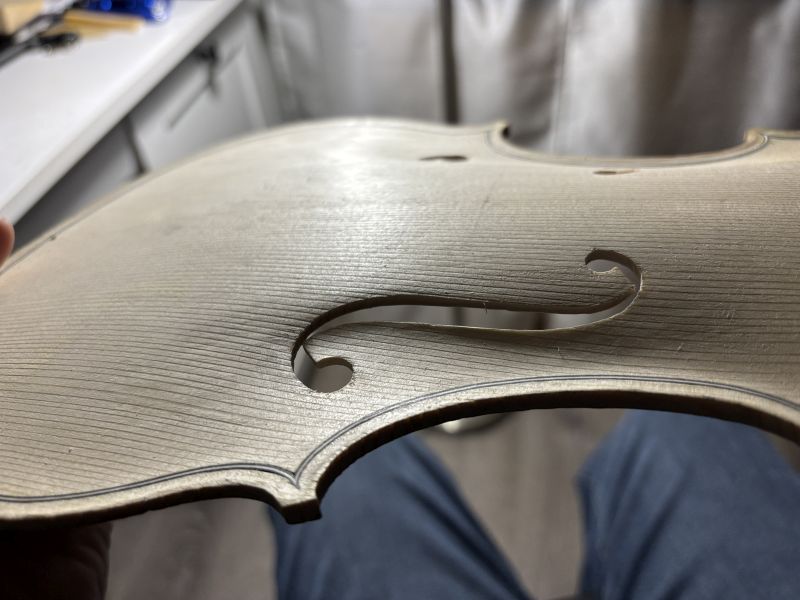
The Strad pics poste earlier are very dark in the F holes so you can't see the thickness of the plate. I cut mine at basically a right angle to the surface of the plate. In the Strad I don't think they varnished the edges but over the centuries something dark has accumulated there.
I spent some time this evening fluting the F holes. they were already sort of concave from the initial shaping of the arch in that area but I did some refinement of the fluting.
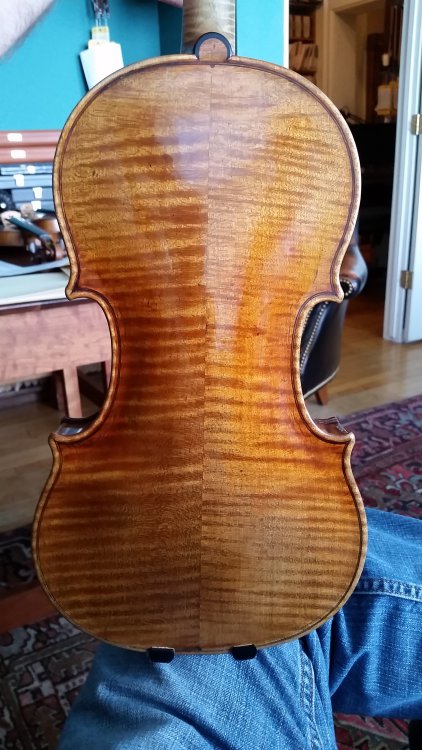
As I said earlier, there's plenty of room for improvement but overall I think they turned out well. Bass side wing is a tiny bit thinner than I had planned. but not by much.
Still a little rough around the edges but there's still work to do to smooth things out. Not too much though, I like going for the corduroy texture.
 |
|
| Back to top |
|
|
MikeCooper
Member
Joined: 08 Nov 2023
Posts: 175
Location: USA Georgia
|
|
| Back to top |
|
|
catbrain
Member
Joined: 22 Sep 2023
Posts: 49
Location: Greeneville TN.
|
| Posted: Sat Jun 07, 2025 4:27 am Post subject: purfling groove |
|
|
| I have found it quite easy (and low stress) to use the cutting tool to cut the parallel grooves--- then I took some steel music wire and made a chisel that is just the width of the groove-- then you can slide it along the groove and it will shave out the center down to the bottom of the cut. Rinse and repeat until the depth is correct..... |
|
| Back to top |
|
|
catbrain
Member
Joined: 22 Sep 2023
Posts: 49
Location: Greeneville TN.
|
| Posted: Sat Jun 07, 2025 4:36 am Post subject: plate edges---- |
|
|
waiting breathlessly to see how the plate edges come out. I spent a lot of time on my 2-nd refining the outer radius and the inner "dish" on the edges-- and also the beautiful asymmetric corners. Still tricky to get the outline of the corners just right. somehow when you hit the right unequal shape your eye says "thats it..." !  |
|
| Back to top |
|
|
MikeCooper
Member
Joined: 08 Nov 2023
Posts: 175
Location: USA Georgia
|
| Posted: Sat Jun 07, 2025 4:15 pm Post subject: |
|
|
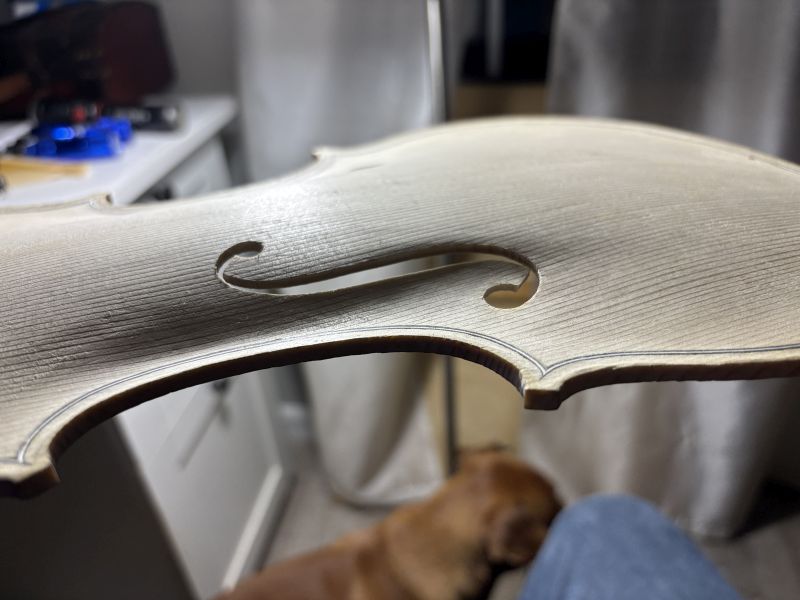
Hi catbrain, you're talking about the purfling channel? My purfling marker / cutter works well especially when I thinned the blade and used it as a one blade cutter with a depth stop. I have a purfling pick that works pretty good although it could be better.
As for shaping the edges, I'm going to put in the bassbar first. Then I'll chamfer the inside edge and probably glue up the box first and finally round over the top edges.
I plan to give the top edge a sort of ridge like you would see on an unworn Strad. |
|
| Back to top |
|
|
MikeCooper
Member
Joined: 08 Nov 2023
Posts: 175
Location: USA Georgia
|
| Posted: Thu Jun 12, 2025 4:56 pm Post subject: |
|
|
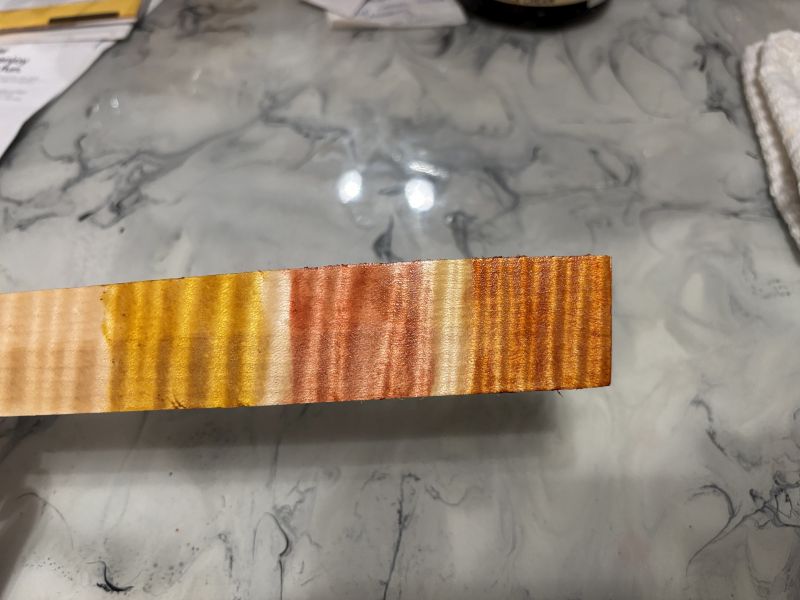
Testing out lake pigments for varnish. It would look better over a good ground layer but this is just a few quick tests of color.
Yellow fustic, red madder and on the right an orange mix of the two.
In the second picture the orange looks more brown, the light source and angle makes a difference. and in the middle is cochineal. To the left of the cochineal is orange and brown madder.
 |
|
| Back to top |
|
|
MikeCooper
Member
Joined: 08 Nov 2023
Posts: 175
Location: USA Georgia
|
| Posted: Sun Jun 15, 2025 9:05 pm Post subject: |
|
|
I spent some time thinning the top plate. It's about 3mm over most of it with only a few spots a bit thinner at about 2.5
It weighs in at 70.8 grams.
I'm not sure if I should go thinner than that or leave it as it is. |
|
| Back to top |
|
|
Michael Darnton
Moderator
Joined: 23 Mar 2007
Posts: 1347
Location: Chicago
|
| Posted: Mon Jun 16, 2025 9:03 am Post subject: |
|
|
FWIW, I like the varnish color on the bottom left the best. It's easy to get too red because red builds faster than other colors so I usually start with something like that color and then add red to the mix very gradually. If you add it too early you end up with pink, as in both second from right samples. Too much red too soon does that.
A friend gave me a great hit once: each layer of varnish should be a color you could live with if you had to stop there.
_________________
new blog at my site! http://darntonviolins.com/blog
my work sites: http://darntonviolins.com and http://darntonhersh.com |
|
| Back to top |
|
|
MikeCooper
Member
Joined: 08 Nov 2023
Posts: 175
Location: USA Georgia
|
| Posted: Mon Jun 16, 2025 12:19 pm Post subject: |
|
|
Michael, thanks for the advice on the color. Last build I used varnish that was gifted to me and I like the color but the formula is a secret and if I want more I have to buy it. And anyway, I like making things so I'm trying to make my own varnish and colors.
What do you think of my top plate thickness? Should I go thinner than 3mm overall? |
|
| Back to top |
|
|
Michael Darnton
Moderator
Joined: 23 Mar 2007
Posts: 1347
Location: Chicago
|
|
| Back to top |
|
|
MikeCooper
Member
Joined: 08 Nov 2023
Posts: 175
Location: USA Georgia
|
| Posted: Tue Jun 17, 2025 6:04 am Post subject: |
|
|
Thanks again! That's interesting, I was already thinking of making it a bit thinner in the center, not from experience since I have no experience but because looking at CT scans of the Titian it seems to be a bit thinner in the central area.
I was thinking of going a bit thinner overall but I guess 3mm is good and I'm ready to move on to fitting a bassbar.
Which brings up another good question, spring the bassbar or not?
My neck block is about 2mm shorter than the rest so the top plate will bend down that little bit from the upper corner blocks. If I fit the bar without any spring then the top plate will be pressing down on the upper part of the bar, meaning the bar will be in turn pressing up on the plate, so should I spring the bar a little bit to account for that?
The little bit of drop from the upper corners to the neck is not much of an angle so I'm thinking it wouldn't matter much either way.
Maybe it depends on how stiff or flexible the bar is, using standard bassbar measurements and profile. |
|
| Back to top |
|
|
Michael Darnton
Moderator
Joined: 23 Mar 2007
Posts: 1347
Location: Chicago
|
|
| Back to top |
|
|
MikeCooper
Member
Joined: 08 Nov 2023
Posts: 175
Location: USA Georgia
|
| Posted: Thu Jul 03, 2025 4:01 pm Post subject: |
|
|
| I have been fitting the bass bar and about ready for gluing it in. I did a little bit of spring, maybe half a mm or a little more on each end. I have no experience with springing bars so I don't know if that's good or bad. Hopefully some pictures tomorrow. |
|
| Back to top |
|
|
|

